The following are the simple tutorial how to build application using Spring Boot Framework.
This knowledge I have gotten when I studied Enterprise Programming in my second semester at my second college. The professor, Samuel Louvan who was really inspiring due to the easy explanation he made, then I can pass the lecturing as well.
I though the practical materials were really systematics.
Before understanding how to build application using Spring Boot Framework, it is better to know the fundamental of layering principal in programming, because Spring Boot Framework actually uses the proper concept. That is Three Tired Web Layers.
Three Tired Web Layers
You might know or not know about this concept. But let me show you how 3 layers develop the whole component of the application.

http://martinfowler.com/bliki/PresentationDomainDataLayering.html
- Presentation layer contains any program that will handle http request and render HTML page
- Domain layer contains any program that is commonly called as the business logic which also contains the validations and the calculations logic
- Data Access layer contains any program that sorts out how to manage persistent data in the database or remote services
Presentation Layer
This layer has responsibility to display the information to the user and interpret command from the user into actions upon the domain and data layer
There are several characteristics owed by the presentation layer such as:
- How to handle interaction between the user and the software
- this can be simple as a command-line or text-based menu system
- These days, it's more likely to be a rich-client graphical user interface (GUI) or and HTML-based browser user interface
Data Source
This layer has responsibility to communicate with the other systems that carry out tasks on behalf of the applications.
There are also several characteristics owed by the Data source such as:
- Communication with the database
- Communication with the other applications
- Communication with the Messaging System
- Communication with the Transaction Managers
Domain Logic
This layer has responsibility determine the work of applications need to do for the domain we are working with.
There are several characteristics owed by Domain logic such as:
- Also referred as Business Logic
- It involves the calculations based on inputs and stored data
- validation of any data that comes in from the presentation layer
- and figuring out exactly what data source logic to dispatch
This domain logic created aim to really hide the data from the presentation layer, so that the user will never access the data directly.
How to separate these layers?
it depends on how complex the application is!
- as the system gets more complex, we would break the three layers into separate classes
- as complexity increased, we would divide the classes into separate packages
Make sure you do some kind of separaiton-at least at the subroutine level!
Rules
The domain and data source should never be dependent on the presentation!
It means there should be no subroutine call from the domain or data source code into the presentation code. because it will be easier for us to substitute with other/different presentations
OK! after this, we will create program using Spring Boot and Eclipse. Before, there are several requirement that you have to meet in the beginning such as:


- Download JDK (Java Development Kit) here
- Set Path JAVA_HOME like here
- Install Eclipse which installed Maven inside, that is NEON version here
- Install Spring Tool Suite (STS) here, or you can directly install by visiting Help -> Market Place
After the above required tools installed in your PC, you can start to build the application by following these steps:
Create New Spring Starter Project
- Open Eclipse

- Install STS through Eclipse Market Place

- After finish installing STS, the system will ask you to restart Eclipse, then please restart Eclipse
- To open Spring Boot project, choose menu File -> New -> Other...
- Please choose Spring Starter Project within the folder Spring

- Use default value from Eclipse to fill the properties

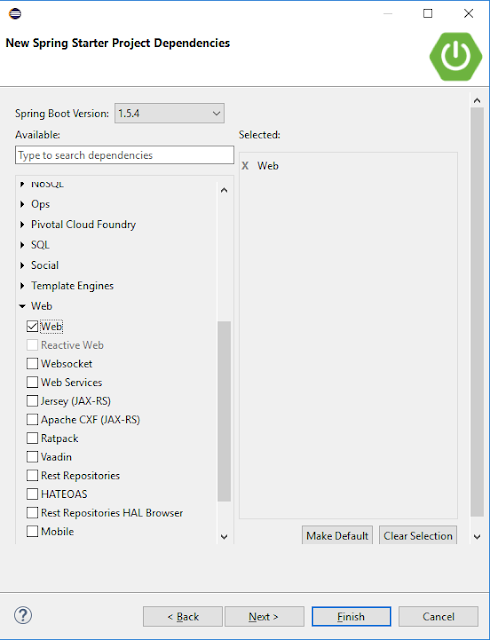
- Click Next, then checklist Web dependency

- Click Finish
Changing Port Number
- As the default, server which is used by Spring Boot has port 8080. If you want to change the port number, you can simply change it by going to src/main/resource to access application.properties. Then, you can add the following code:
server.port = 9090
- In the src.main.java, create new file HelloWorldController.java and add the following code
package com.example;
import org.springframework.web.bind.annotation.RequestMapping;
import org.springframework.web.bind.annotation.RestController;
@RestController public class HelloWorldController {
@RequestMapping("/")
public String index () {
return "Hello World!";
}
import org.springframework.web.bind.annotation.RequestMapping;
import org.springframework.web.bind.annotation.RestController;
@RestController public class HelloWorldController {
@RequestMapping("/")
public String index () {
return "Hello World!";
}
}

- Run the project, Run As Java Application

Using Page Controller
- Change pom.xml and add the following code:
dependency>
<groupId>org.springframework.boot</groupId>
<artifactId>spring-boot-starter-thymeleaf</artifactId>
<groupId>org.springframework.boot</groupId>
<artifactId>spring-boot-starter-thymeleaf</artifactId>
</dependency>
- Create the HTML page at src/main/resources/templates/hello.html
<!DOCTYPE html> <html xmlns:th="http://www.thymeleaf.org">
<head>
<title>First Page</title>
</head>
<body>
<h1>Hello, world!</h1>
</body>
<head>
<title>First Page</title>
</head>
<body>
<h1>Hello, world!</h1>
</body>
</html>
- Create Controller page for HTML in the src/main/java/PageController.java and add the following code:
package com.example;
import org.springframework.stereotype.Controller;
import org.springframework.web.bind.annotation.RequestMapping;
@Controller
public class PageController {
@RequestMapping("/hello")
public String index(){
return "hello";
}
@RequestMapping("/hello")
public String index(){
return "hello";
}
}


